How to Add a Webroot VPN to My Webroot Account: Easy Steps
Learn how to add a Webroot VPN to my Webroot account with easy-to-follow steps. This guide will help you enhance your online security and privacy seamlessly.
In today’s digital age, online security is paramount. Adding a VPN (Virtual Private Network) to your Webroot account can significantly enhance your privacy and protect your data from cyber threats.
Webroot offers a reliable VPN service that can be seamlessly integrated with your existing Webroot account. This article will guide you through the process of adding a Webroot VPN to your Webroot account, ensuring a secure and private online experience.
What is Webroot VPN?
A VPN is a tool that encrypts your internet connection, providing a secure and private tunnel for your online activities.
Webroot VPN offers robust features such as anonymous browsing, protection from hackers, and access to geo-restricted content.
By integrating Webroot VPN with your Webroot account, you can manage your security tools from a single platform, making it convenient and efficient.
Why Add a Webroot VPN to Your Webroot Account?
Adding a Webroot VPN to your Webroot account enhances your cybersecurity arsenal. It provides an additional layer of protection by masking your IP address and encrypting your internet traffic.
This prevents hackers and third parties from tracking your online activities. Moreover, it allows you to access content that may be restricted in your region, providing a more open and secure internet experience.
How to Add a Webroot VPN to My Webroot Account: Easy Steps
Adding a Webroot VPN to your Webroot account is a straightforward process. Follow these easy steps to enhance your online security and privacy.
Step 1: Purchase a Webroot VPN Subscription
To add a Webroot VPN to your Webroot account, you first need to purchase a subscription. Visit the Webroot website and choose a VPN plan that suits your needs. Once you have completed the purchase, you will receive an activation code.
Step 2: Log in to Your Webroot Account
Next, log in to your Webroot account using your credentials. If you do not have an account, you will need to create one by providing your email address and setting a password.
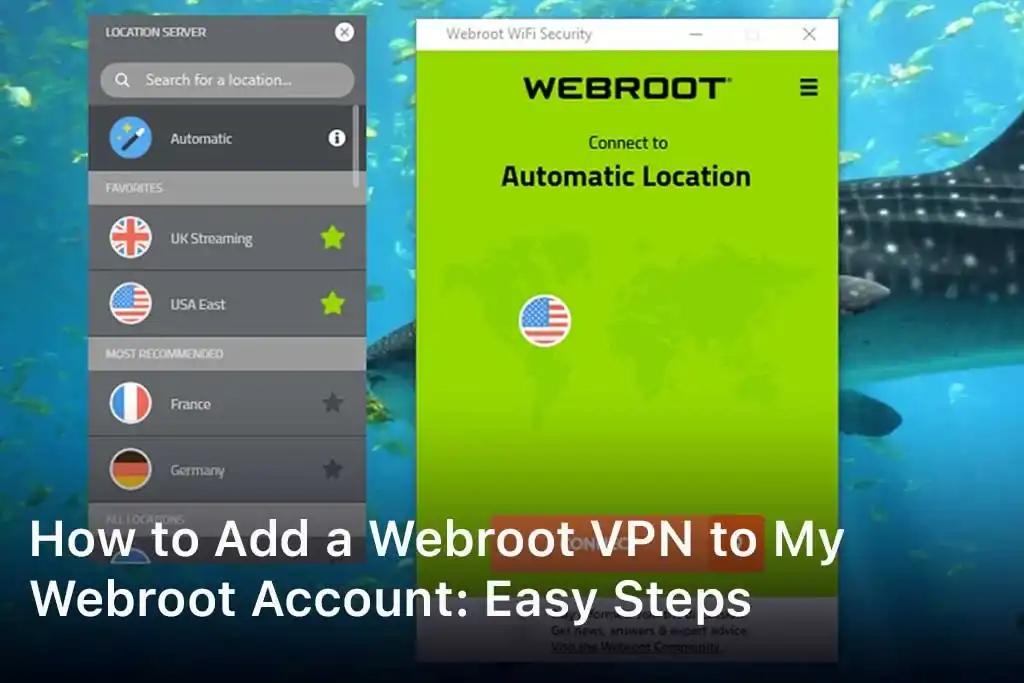
Step 3: Navigate to the VPN Section
After logging in, navigate to the VPN section within your Webroot account dashboard. This section is where you can manage your VPN settings and activate your VPN subscription.
Step 4: Enter Your Activation Code
In the VPN section, you will see an option to enter your activation code. Enter the code you received after purchasing your subscription and click “Activate.” This will link your VPN subscription to your Webroot account.
Step 5: Download and Install Webroot VPN
Once your subscription is activated, you will be prompted to download the Webroot VPN software. Download and install the software on your device. Follow the on-screen instructions to complete the installation process.
Step 6: Log in to Webroot VPN
After installation, open the Webroot VPN application and log in using your Webroot account credentials. This will enable you to access all the VPN features and settings.
Step 7: Configure Your VPN Settings
Once logged in, you can configure your VPN settings according to your preferences. This includes choosing your preferred server location, enabling auto-connect, and adjusting security settings.
Step 8: Connect to Webroot VPN
Finally, connect to the Webroot VPN by clicking the “Connect” button in the application. Your internet connection will now be encrypted, and your IP address will be masked, ensuring a secure and private browsing experience.
Benefits of Using Webroot VPN
Enhanced Security
Webroot VPN encrypts your internet traffic, providing a secure connection that protects your data from hackers and cybercriminals.
Privacy Protection
By masking your IP address, Webroot VPN ensures that your online activities remain private and anonymous.
Access to Geo-Restricted Content
Webroot VPN allows you to bypass geographical restrictions, giving you access to content that may be blocked in your region.
Easy Integration
Integrating Webroot VPN with your Webroot account makes it easy to manage all your security tools from a single platform.
Troubleshooting Common Issues
VPN Connection Problems
If you encounter issues connecting to the Webroot VPN, try the following steps:
- Ensure your internet connection is stable.
- Restart the Webroot VPN application.
- Change the server location.
- Reinstall the Webroot VPN software.
Activation Code Errors
If your activation code is not working, double-check that you have entered it correctly. If the issue persists, contact Webroot support for assistance.
Slow Internet Speeds
If you experience slow internet speeds while using the Webroot VPN, try connecting to a different server. Some servers may be faster than others depending on your location and network traffic.
FAQs
What is a Webroot VPN?
A Webroot VPN is a Virtual Private Network service provided by Webroot that encrypts your internet connection, enhancing your online security and privacy.
How do I purchase a Webroot VPN subscription?
You can purchase a Webroot VPN subscription by visiting the Webroot website and selecting a plan that suits your needs. After purchasing, you will receive an activation code.
Can I use Webroot VPN on multiple devices?
Yes, Webroot VPN can be used on multiple devices. Check your subscription plan for details on the number of devices supported.
How do I activate my Webroot VPN subscription?
To activate your Webroot VPN subscription, log in to your Webroot account, navigate to the VPN section, and enter your activation code.
What should I do if my activation code is not working?
If your activation code is not working, ensure you have entered it correctly. If the issue persists, contact Webroot support for assistance.
How do I download and install Webroot VPN?
After activating your subscription, you can download the Webroot VPN software from the VPN section of your Webroot account. Follow the on-screen instructions to install the software on your device.
Can I change my VPN server location?
Yes, you can change your VPN server location within the Webroot VPN application. Choose a server that best suits your needs.
What should I do if my VPN connection is slow?
If your VPN connection is slow, try connecting to a different server. Some servers may offer faster speeds depending on your location and network traffic.
How do I log in to Webroot VPN?
Open the Webroot VPN application and log in using your Webroot account credentials to access all the VPN features and settings.
Can I use Webroot VPN with my existing Webroot security products?
Yes, Webroot VPN can be integrated with your existing Webroot security products, allowing you to manage all your security tools from a single platform.
Is Webroot VPN safe to use?
Yes, Webroot VPN is safe to use. It encrypts your internet traffic, providing a secure connection that protects your data from hackers and cybercriminals.
How do I configure my Webroot VPN settings?
You can configure your Webroot VPN settings within the application. This includes choosing your preferred server location, enabling auto-connect, and adjusting security settings.
What should I do if I encounter issues with Webroot VPN?
If you encounter issues with Webroot VPN, try restarting the application, changing the server location, or reinstalling the software. If the issue persists, contact Webroot support for assistance.
How do I contact Webroot support?
You can contact Webroot support through their website or by calling their customer service hotline for assistance with any issues you may encounter.
Can I use Webroot VPN to access geo-restricted content?
Yes, Webroot VPN allows you to bypass geographical restrictions, giving you access to content that may be blocked in your region.
How do I ensure my Webroot VPN is always connected?
You can enable the auto-connect feature within the Webroot VPN application to ensure your VPN is always connected, providing continuous protection.
What is the benefit of integrating Webroot VPN with my Webroot account?
Integrating Webroot VPN with your Webroot account makes it easy to manage all your security tools from a single platform, enhancing convenience and efficiency.
How do I update my Webroot VPN software?
You can update your Webroot VPN software through the application or by visiting the Webroot website for the latest version.
Is there a free trial for Webroot VPN?
Webroot occasionally offers free trials for their VPN service. Check the Webroot website for any ongoing promotions or trials.
How do I cancel my Webroot VPN subscription?
To cancel your Webroot VPN subscription, log in to your Webroot account, navigate to the subscription section, and follow the instructions to cancel your plan.
Conclusion
Adding a Webroot VPN to your Webroot account is a simple yet powerful way to enhance your online security and privacy.
By following the steps outlined in this guide, you can seamlessly integrate Webroot VPN with your existing Webroot account, ensuring a secure and private internet experience.
Whether you are looking to protect your data from cyber threats or access geo-restricted content, Webroot VPN offers a reliable and user-friendly solution. Stay safe and secure online by adding a Webroot VPN to your Webroot account today.
